
Spring
1.Spring
1.1简介
Spring : 春天 --->给软件行业带来了春天
2002年,Rod Jahnson首次推出了Spring框架雏形interface21框架。
2004年3月24日,Spring框架以interface21框架为基础,经过重新设计,发布了1.0正式版。
很难想象Rod Johnson的学历 , 他是悉尼大学的博士,然而他的专业不是计算机,而是音乐学。
Spring理念 : 使现有技术更加实用 . 本身就是一个大杂烩 , 整合现有的框架技术
官网 : http://spring.io/
官方下载地址 : https://repo.spring.io/libs-release-local/org/springframework/spring/
GitHub : https://github.com/spring-projects
spring文档:spring文档
1.2优点
- Spring是一个开源的免费的框架(容器)!
- Spring是一个轻量级的、非入侵式的框架!
- 控制反转(IOC),面向切面编程(AOP)!
- 支持事务的处理,对框架整合的支持!
总结:Spring是一个轻量级的控制反转(IOC)面向切面(AOP)编程的框架(容器)!
1.3组成
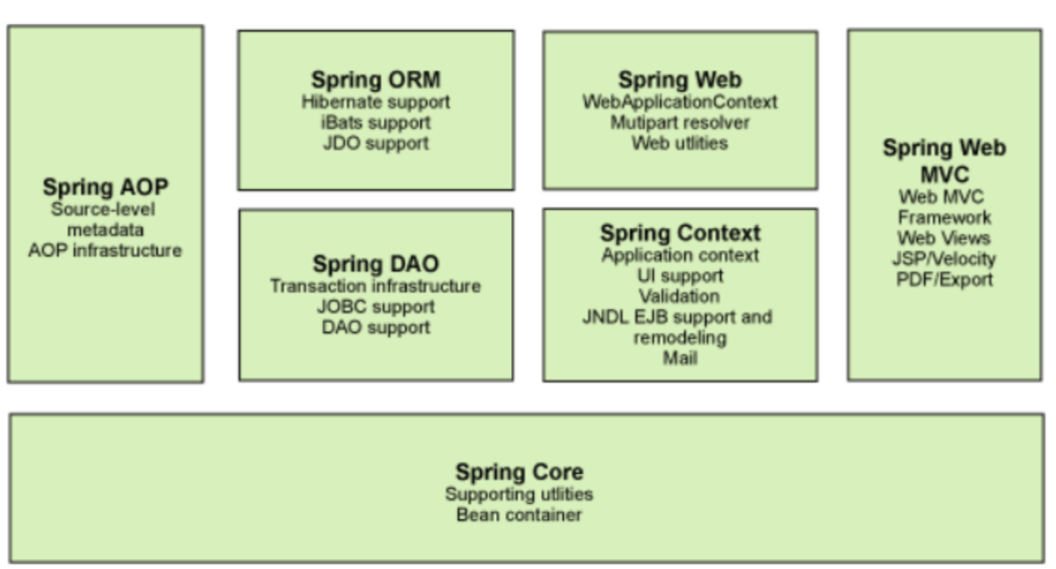 在Spring的官网有这个介绍:现代化的Java开发!说白了就是基于Spring的开发!
组成 Spring 框架的每个模块(或组件)都可以单独存在,或者与其他一个或多个模块联合实现。每个模块的功能如下:
核心容器:核心容器提供 Spring 框架的基本功能。核心容器的主要组件是 BeanFactory,它是工厂模式的实现。BeanFactory 使用控制反转(IOC) 模式将应用程序的配置和依赖性规范与实际的应用程序代码分开。
Spring 上下文:Spring 上下文是一个配置文件,向 Spring 框架提供上下文信息。Spring 上下文包括企业服务,例如 JNDI、EJB、电子邮件、国际化、校验和调度功能。
Spring AOP:通过配置管理特性,Spring AOP 模块直接将面向切面的编程功能 , 集成到了 Spring 框架中。所以,可以很容易地使 Spring 框架管理任何支持 AOP的对象。Spring AOP 模块为基于 Spring 的应用程序中的对象提供了事务管理服务。通过使用 Spring AOP,不用依赖组件,就可以将声明性事务管理集成到应用程序中。
Spring DAO:JDBC DAO 抽象层提供了有意义的异常层次结构,可用该结构来管理异常处理和不同数据库供应商抛出的错误消息。异常层次结构简化了错误处理,并且极大地降低了需要编写的异常代码数量(例如打开和关闭连接)。Spring DAO 的面向 JDBC 的异常遵从通用的 DAO 异常层次结构。
Spring ORM:Spring 框架插入了若干个 ORM 框架,从而提供了 ORM 的对象关系工具,其中包括 JDO、Hibernate 和 iBatis SQL Map。所有这些都遵从 Spring 的通用事务和 DAO 异常层次结构。
Spring Web 模块:Web 上下文模块建立在应用程序上下文模块之上,为基于 Web 的应用程序提供了上下文。所以,Spring 框架支持与 Jakarta Struts 的集成。Web 模块还简化了处理多部分请求以及将请求参数绑定到域对象的工作。
Spring MVC 框架:MVC 框架是一个全功能的构建 Web 应用程序的 MVC 实现。通过策略接口,MVC 框架变成为高度可配置的,MVC 容纳了大量视图技术,其中包括 JSP、Velocity、Tiles、iText 和 POI。
拓展
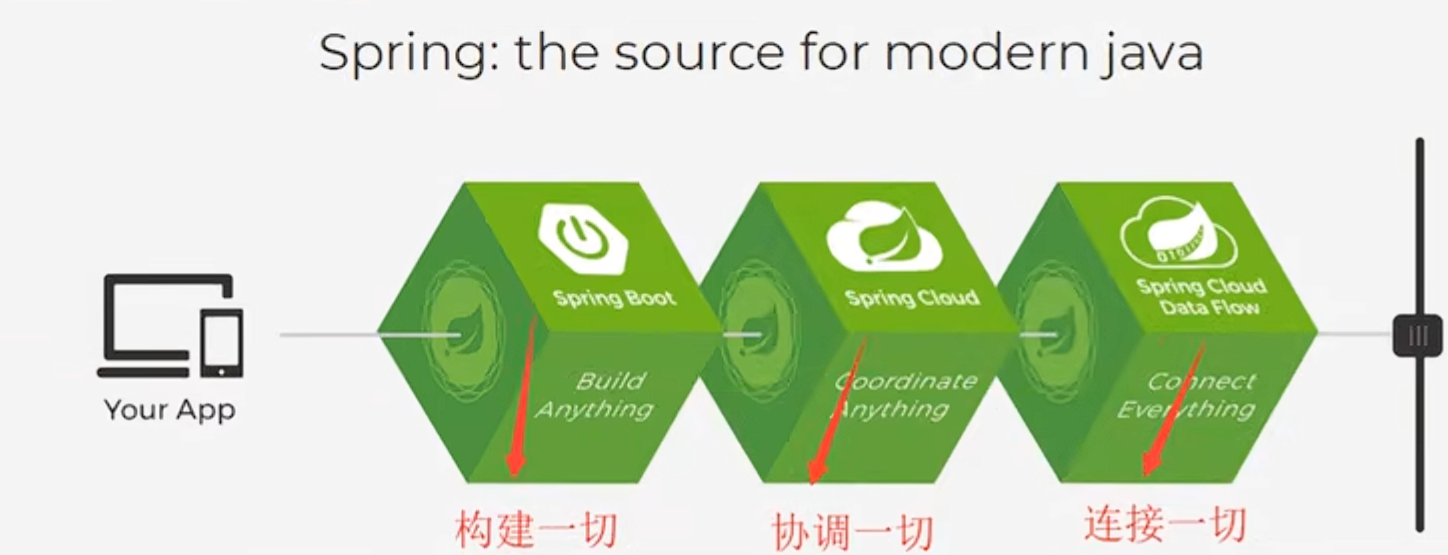
Spring Boot 是 Spring 的一套快速配置脚手架,可以基于Spring Boot 快速开发单个微服务;
Spring Cloud是基于Spring Boot实现的;
Spring Boot专注于快速、方便集成的单个微服务个体,Spring Cloud关注全局的服务治理框架;
Spring Boot使用了约束优于配置的理念,很多集成方案已经帮你选择好了,能不配置就不配置 , Spring Cloud很大的一部分是基于Spring Boot来实现,Spring Boot可以离开Spring Cloud独立使用开发项目,但是Spring Cloud离不开Spring Boot,属于依赖的关系。
SpringBoot在SpringClound中起到了承上启下的作用,如果你要学习SpringCloud必须要学习SpringBoot。
Spring Boot
- 一个快速开发的脚手架
- 基于Spring Boot可以快速开发单个微服务
- 约定大于配置
Spring Cloud
- 基于Spring Boot实现
因为大多数公司都在使用SpringBoot开发,学习SpringBoot前提 ,需要完全掌握Spring和Spring MVC!
弊端:发展太久之后,违背了原来的理念!配置十分繁琐,人称“配置地狱!”
2.IOC推导
我们先用传统方式写一段代码,看看问题在哪!
先写一个 UserDao 接口
UserDao.javapublic interface UserDao { void getUser(); }再去写 Dao 的实现类
UserDaoImpl.javapublic class UserDaoImpl implements UserDao { public void getUser() { System.out.println("默认获取用户的数据"); } }然后写 UserService 的接口
UserService.javapublic interface UserService { void getUser(); }最后写 Service 的实现类
UserServiceImpl.javapublic class UserServiceImpl implements UserService { // 程序主动创建对象,控制权在程序员手上 private UserDao userDao = new UserDaoImpl(); public void getUser() { userDao.getUser(); } }
在我们之前的业务中,用户的需求可能会影响原来的代码,需要根据需求修改源码!如果程序代码量十分大,修改一次的代价十分昂贵!
我们改用 Set 接口实现,发生了革命性变化:
public class UserServiceImpl implements UserService {
    private UserDao userDao;
    // 利用 set 动态注入实现类,程序不再主动 new
    public void setUserDao(UserDao userDao) {
        this.userDao = userDao;
    }
    public void getUser() {
        userDao.getUser();
    }
}之前,程序是主动创建对象,控制权在程序员手上;使用了 set 注入之后,程序不再具有主动性,而是变成了被动接收对象!
这种思想从本质上解决了问题,程序员不用再去管理对象的创建,更多去关注业务的实现,耦合性大大降低。这也就是 IoC 的原型!
IOC本质
控制反转IoC(Inversion of Control),是一种设计思想,DI(依赖注入)是实现IoC的一种方法,也有人认为DI只是IoC的另一种说法。没有IoC的程序中 , 我们使用面向对象编程 , 对象的创建与对象间的依赖关系完全硬编码在程序中,对象的创建由程序自己控制,控制反转后将对象的创建转移给第三方,个人认为所谓控制反转就是:获得依赖对象的方式反转了。
图示:IoC 思想演进 —— 程序由「主动创建对象」转变为「被动接收对象」(控制反转)。
IoC是Spring框架的核心内容,使用多种方式完美的实现了IoC,可以使用XML配置,也可以使用注解,新版本的Spring也可以零配置实现IoC。
Spring容器在初始化时先读取配置文件,根据配置文件或元数据创建与组织对象存入容器中,程序使用时再从Ioc容器中取出需要的对象。
图示:Spring 容器工作流程 —— 读取配置/元数据 → 创建并组织对象存入容器 → 使用时再取出。
采用XML方式配置Bean的时候,Bean的定义信息是和实现分离的,而采用注解的方式可以把两者合为一体,Bean的定义信息直接以注解的形式定义在实现类中,从而达到了零配置的目的。
控制反转是一种通过描述(XML或注解)并通过第三方去生产或获取特定对象的方式。在Spring中实现控制反转的是IoC容器,其实现方法是依赖注入(Dependency Injection,DI)。
3.Hello Spring
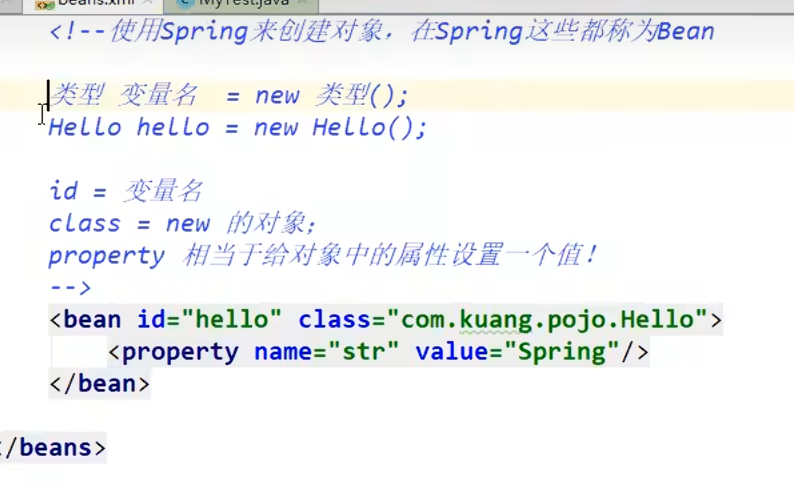 对象由Spring 来创建 , 管理 , 装配 !
4.IOC创建对象的方式
使用无参构造,默认!
使用有参构造(下标 / 类型 / 参数名):
beans.xml<bean id="user" class="com.kuang.pojo.User"> <!-- 方式一:下标赋值(推荐,清晰不易错) --> <constructor-arg index="0" value="张三"/> </bean> <bean id="user2" class="com.kuang.pojo.User"> <!-- 方式二:类型(同类型参数多时不推荐) --> <constructor-arg type="java.lang.String" value="李四"/> </bean> <bean id="user3" class="com.kuang.pojo.User"> <!-- 方式三:参数名(直接写构造器参数名) --> <constructor-arg name="name" value="王五"/> </bean>若实体类没有无参构造,又未配置有参构造注入,容器初始化时会报
No default constructor异常。
5.Spring配置
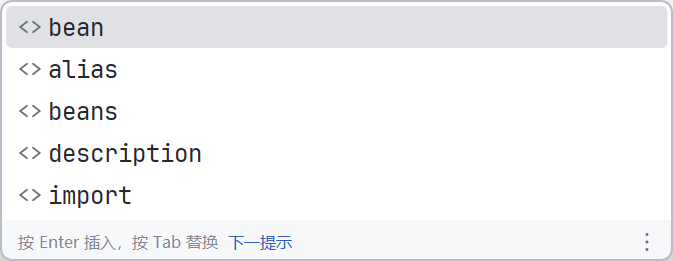
bean
beans.xml<!-- id: bean的唯一标识符 也就是我们学的对象名 class: bean对象所对应的全类名 包名+类名 name: 给这个bean对象起一个别名 property: 给这个bean对象设置属性 --> <bean id="userHansome" class="com.kuang.pojo.User" name="hahaha"> <property name="name" value="张三"/> </bean>alias
beans.xml<!--如果添加了别名,我们也可以使用别名获取这个对象 --> <alias name="user" alias="宇宙无敌大帅哥"/>myTest.javaimport com.kuang.pojo.User; import org.springframework.context.ApplicationContext; import org.springframework.context.support.ClassPathXmlApplicationContext; public class myTest { public static void main(String[] args) { ApplicationContext context = new ClassPathXmlApplicationContext("beans.xml"); User user = (User) context.getBean("宇宙无敌大帅哥"); user.show(); } }description
<description>这是一个配置文件</description>import
import一般用于多团队开发使用,可将多个配置合并成一个导入到配置中
<?xml version="1.0" encoding="UTF-8"?>
<beans xmlns="http://www.springframework.org/schema/beans"
xmlns:xsi="http://www.w3.org/2001/XMLSchema-instance"
xsi:schemaLocation="http://www.springframework.org/schema/beans http://www.springframework.org/schema/beans/spring-beans.xsd">
<import resource="beans.xml" />
<import resource="beans2.xml" />
</beans><?xml version="1.0" encoding="UTF-8"?>
<beans xmlns="http://www.springframework.org/schema/beans"
xmlns:xsi="http://www.w3.org/2001/XMLSchema-instance"
xsi:schemaLocation="http://www.springframework.org/schema/beans http://www.springframework.org/schema/beans/spring-beans.xsd">
<bean id="user" class="com.kuang.pojo.User">
<property name="name" value="张三"/>
</bean>
<bean id="userT" class="com.kuang.pojo.UserT">
</bean>
  <!--
      id: bean的唯一标识符 也就是我们学的对象名
      class: bean对象所对应的全类名 包名+类名
      name: 给这个bean对象起一个别名
      property: 给这个bean对象设置属性
  -->
  <bean id="userHansome" class="com.kuang.pojo.User" name="hahaha">
          <property name="name" value="张三"/>
  </bean>
  <!--如果添加了别名,我们也可以使用别名获取这个对象    -->
  <alias name="user" alias="宇宙无敌大帅哥"/>
</beans><?xml version="1.0" encoding="UTF-8"?>
<beans xmlns="http://www.springframework.org/schema/beans"
xmlns:xsi="http://www.w3.org/2001/XMLSchema-instance"
xsi:schemaLocation="http://www.springframework.org/schema/beans http://www.springframework.org/schema/beans/spring-beans.xsd">
<bean id="user" class="com.kuang.pojo.User">
<property name="name" value="张三"/>
</bean>
<bean id="userT" class="com.kuang.pojo.UserT">
</bean>
<!--如果添加 -->
<alias name="user" alias="宇宙无敌大帅哥"/>
</beans>6.依赖注入
依赖注入(Dependency Injection, DI)是 IoC 的一种实现方式。所谓依赖注入,就是由 IoC 容器在运行期间,动态地将某种依赖关系注入到对象之中。
构造器注入已在「IOC创建对象的方式」中讲过,这里重点讲 Set 注入 和 命名空间注入。
1.Set 注入(重点)
要求被注入的实体类:有【无参构造】+ 有【对应的 setter 方法】。
public class Student {
    private String name;
    private Address address;          // 引用类型(bean)
    private String[] books;           // 数组
    private List<String> hobbies;     // List
    private Map<String, String> card; // Map
    private Set<String> games;        // Set
    private String wife;              // null 值
    private Properties info;          // Properties

    // 省略所有 setter / getter / toString
}public class Address {
private String address;
// setter / getter / toString
}对应的 beans.xml 注入:
<bean id="address" class="com.kuang.pojo.Address">
    <property name="address" value="西安"/>
</bean>

<bean id="student" class="com.kuang.pojo.Student">
    <!-- 1.普通值(常量) -->
    <property name="name" value="小明"/>

    <!-- 2.引用类型(bean) -->
    <property name="address" ref="address"/>

    <!-- 3.数组 -->
    <property name="books">
        <array>
            <value>西游记</value>
            <value>红楼梦</value>
            <value>水浒传</value>
        </array>
    </property>

    <!-- 4.List -->
    <property name="hobbies">
        <list>
            <value>听歌</value>
            <value>敲代码</value>
            <value>看电影</value>
        </list>
    </property>

    <!-- 5.Map -->
    <property name="card">
        <map>
            <entry key="身份证" value="123456789"/>
            <entry key="银行卡" value="987654321"/>
        </map>
    </property>

    <!-- 6.Set -->
    <property name="games">
        <set>
            <value>LOL</value>
            <value>COC</value>
            <value>BOB</value>
        </set>
    </property>

    <!-- 7.null 值(注意:不是空字符串 "") -->
    <property name="wife">
        <null/>
    </property>

    <!-- 8.Properties -->
    <property name="info">
        <props>
            <prop key="学号">2021001</prop>
            <prop key="性别">男</prop>
            <prop key="姓名">小明</prop>
        </props>
    </property>
</bean>
2.p 命名空间注入
需要在 beans 标签中引入 xmlns:p="http://www.springframework.org/schema/p",底层仍是 setter 注入。
<beans xmlns="http://www.springframework.org/schema/beans"
       xmlns:xsi="http://www.w3.org/2001/XMLSchema-instance"
       xmlns:p="http://www.springframework.org/schema/p"
       xsi:schemaLocation="http://www.springframework.org/schema/beans
           https://www.springframework.org/schema/beans/spring-beans.xsd">

    <!-- p:属性名  等价于 <property name="name" value="..."/> -->
    <bean id="user" class="com.kuang.pojo.User" p:name="张三" p:age="18"/>
</beans>
3.c 命名空间注入
引入 xmlns:c="http://www.springframework.org/schema/c",底层是有参构造注入。
<beans xmlns="http://www.springframework.org/schema/beans"
       xmlns:xsi="http://www.w3.org/2001/XMLSchema-instance"
       xmlns:c="http://www.springframework.org/schema/c"
       xsi:schemaLocation="http://www.springframework.org/schema/beans
           https://www.springframework.org/schema/beans/spring-beans.xsd">

    <!-- c:构造器参数名 -->
    <bean id="user" class="com.kuang.pojo.User" c:name="李四" c:age="20"/>
</beans>注意:p/c 命名空间依赖 XML Schema 校验,IDE 可能短暂报红但运行无碍;也可直接使用
<property>/<constructor-arg>写法。
7.Bean自动装配
自动装配是 Spring 满足 bean 之间依赖关系的一种方式,它会自动在应用上下文中查找,并给 bean 装配属性,无需手动写 ref。
1.XML 中的自动装配
在 <bean> 上通过 autowire 指定:
byName:根据setXxx方法名(去掉 set、首字母小写)去容器中找 id 相同的 bean。byType:根据属性类型去容器中找唯一的 bean(有多个同类型会报错)。
<bean id="cat" class="com.kuang.pojo.Cat"/>
<bean id="dog" class="com.kuang.pojo.Dog"/>

<!-- byName:会去找 id="cat"/"dog" 的 bean 注入 -->
<bean id="people" class="com.kuang.pojo.People" autowire="byName"/>
byName 注意:bean 的 id 必须与
setXxx对应的名字一致;byType 注意:容器中该类型只能有一个,否则NoUniqueBeanDefinitionException。
2.注解实现自动装配(推荐)
先开启注解支持:
<?xml version="1.0" encoding="UTF-8"?>
<beans xmlns="http://www.springframework.org/schema/beans"
       xmlns:xsi="http://www.w3.org/2001/XMLSchema-instance"
       xmlns:context="http://www.springframework.org/schema/context"
       xsi:schemaLocation="http://www.springframework.org/schema/beans
           https://www.springframework.org/schema/beans/spring-beans.xsd
           http://www.springframework.org/schema/context
           https://www.springframework.org/schema/context/spring-context.xsd">

    <!-- 开启注解支持(含 Autowired / Qualifier 等) -->
    <context:annotation-config/>
</beans>@Autowired:按类型自动装配;可加required = false允许为 null;配合@Qualifier("id")指定具体 bean。@Nullable:标记字段/参数可为空。@Resource(JSR-250,JDK 自带):默认先byName,失败再byType,可用name显式指定。
public class People {
    // 优先按类型装配;有多个同类型时用 @Qualifier 指定
    @Autowired
    @Qualifier("cat")
    private Cat cat;

    @Autowired
    private Dog dog;
}public class People {
@Resource(name = "cat") // 指定 name 即 byName
private Cat cat;
@Resource
private Dog dog;
}
@Autowiredvs@Resource:@Autowired是 Spring 提供,默认 byType,可配合@Qualifier精确控制;@Resource是 JDK 规范,默认 byName。
8.使用注解开发
在 Spring 4 之后,注解开发已成为主流,可大幅减少 xml 配置。
1.开启注解扫描
<context:component-scan base-package="com.kuang.pojo"/>
<context:annotation-config/>
2.Bean 的衍生注解(功能一样,名字用于分层)
@Component:普通组件@Repository:dao 层@Service:service 层@Controller:web 层
@Component("user")   // 等价于 <bean id="user" class="...">
public class User {
    @Value("张三")    // 注入属性值,等价于 <property name="name" value="张三"/>
    public String name;
}
3.作用域
@Component
@Scope("singleton")   // singleton(默认) / prototype
public class User { }
4.小结
@Component及其衍生注解 +@Value可完全替代<bean>与<property>;- 配合
@Scope、@Autowired、@Qualifier、@Resource使用; - xml 与注解最佳实践:xml 负责管理 bean 的装配关系,注解负责属性注入,二者互补。
9.使用Java的方式配置Spring
Spring 支持完全不使用 xml,用纯 Java 代码完成配置(Spring Boot 的底层思想)。
1.配置类
@Configuration   // 等价于 beans.xml
@ComponentScan("com.kuang.pojo")  // 扫描包
@Import(MyConfig2.class)          // 导入其他配置类,合并bean
public class MyConfig {

    // 注册一个 bean;方法名 = bean 的 id;返回值 = 类型
    @Bean
    public User user() {
        return new User();
    }
}@Configuration
public class MyConfig2 {
@Bean
public Cat cat() {
return new Cat();
}
}2.获取容器
public class Test {
    public static void main(String[] args) {
        // 通过注解配置类获取容器(不再是 ClassPathXmlApplicationContext)
        ApplicationContext context =
                new AnnotationConfigApplicationContext(MyConfig.class);
        User user = context.getBean("user", User.class);
        System.out.println(user.getName());
    }
}注意:被
@Configuration标注的类本身也是一个组件,会被 Spring 接管;@Bean方法名即 bean 的 id,也可通过@Bean("xxx")指定。
10.代理模式
代理模式是 Spring AOP 的底层基础。
1.角色分析
- 抽象角色:接口(如
Rent租房) - 真实角色:被代理的对象(如
Host房东) - 代理角色:代理真实角色,并做额外操作(如收中介费)
- 客户:访问代理对象的人
// 抽象角色
public interface Rent { void rent(); }

// 真实角色
public class Host implements Rent {
    public void rent() { System.out.println("房东出租房子"); }
}

// 代理角色
public class Proxy implements Rent {
    private Host host;
    public Proxy(Host host) { this.host = host; }
    public void rent() {
        seeHouse();
        host.rent();
        fare();
    }
    public void seeHouse() { System.out.println("中介带看房"); }
    public void fare()     { System.out.println("中介收中介费"); }
}

// 客户
public class Client {
    public static void main(String[] args) {
        Host host = new Host();
        Proxy proxy = new Proxy(host);
        proxy.rent();
    }
}
2.优缺点
- 优点:真实角色更纯粹;公共业务(日志、权限)交给代理,职责清晰;易横向扩展。
- 缺点:每个真实角色都要写一个代理类,类数量翻倍(→ 引出动态代理)。
3.动态代理
- JDK 动态代理:基于接口,使用
Proxy.newProxyInstance(...)+InvocationHandler。 - CGLIB:基于类(无需接口,底层用继承)。
public class ProxyInvocationHandler implements InvocationHandler {
    private Object target;  // 被代理的真实对象
    public void setTarget(Object target) { this.target = target; }

    public Object getProxy() {
        return Proxy.newProxyInstance(
                target.getClass().getClassLoader(),
                target.getClass().getInterfaces(),
                this);
    }

    // 调用代理对象的任意方法都会经过这里
    public Object invoke(Object proxy, Method method, Object[] args) throws Throwable {
        log(method.getName());          // 额外操作
        return method.invoke(target, args);
    }
    private void log(String msg) { System.out.println("执行了" + msg + "方法"); }
}动态代理的好处:一个代理类可以代理一整类(甚至所有)真实对象,使业务代码与代理逻辑解耦。AOP 正是基于此实现。
11.AOP
AOP(Aspect Oriented Programming,面向切面编程)通过预编译方式和运行期动态代理实现程序功能的统一维护。它是 OOP 的补充,是 Spring 框架的核心之一。
1.AOP 在 Spring 中的作用
提供声明式事务、允许用户自定义切面,实现:横切关注点(日志、安全、事务等)与业务逻辑的分离。
核心术语:
- 横切关注点:被多个方法重复使用的功能(如日志)。
- 切面(Aspect):横切关注点模块化的类。
- 切入点(PointCut):切面在何处生效(匹配哪些方法)。
- 通知(Advice):切面在切入点执行的动作(何时 + 做什么)。
2.通知类型
- 前置通知
Before:方法执行前 - 后置通知
AfterReturning:方法正常返回后 - 环绕通知
Around:方法前后都执行(最强大,可控制是否执行原方法) - 异常抛出通知
AfterThrowing:方法抛异常后 - 最终通知
After:方法结束后(无论成功失败)
3.方式一:使用 Spring API(接口实现)
public class Log implements MethodBeforeAdvice {
    public void before(Method method, Object[] args, Object target) {
        System.out.println(target.getClass().getName() + "的"
                + method.getName() + "被执行了");
    }
}<aop:config>
<!-- 切入点:execution(返回值 包.类.方法(参数)) -->
<aop:pointcut id="pointcut"
expression="execution(* com.kuang.service.UserServiceImpl.*(..))"/>
<!-- advisor 把 通知类 织入 切入点 -->
<aop:advisor advice-ref="log" pointcut-ref="pointcut"/>
</aop:config>4.方式二:自定义类(切面)
public class DiyPointCut {
    public void before() { System.out.println("===方法执行前==="); }
    public void after()  { System.out.println("===方法执行后==="); }
}<bean id="diy" class="com.kuang.diy.DiyPointCut"/>
<aop:config>
<aop:aspect ref="diy">
<aop:pointcut id="pc" expression="execution(* com.kuang.service.*.*(..))"/>
<aop:before method="before" pointcut-ref="pc"/>
<aop:after method="after" pointcut-ref="pc"/>
</aop:aspect>
</aop:config>5.方式三:注解实现(最常用)
@Aspect   // 标注为切面
@Component
public class AnnotationPointCut {

    @Before("execution(* com.kuang.service.*.*(..))")
    public void before() { System.out.println("注解-方法执行前"); }

    @Around("execution(* com.kuang.service.*.*(..))")
    public Object around(ProceedingJoinPoint jp) throws Throwable {
        System.out.println("环绕前");
        Object r = jp.proceed();   // 执行原方法
        System.out.println("环绕后");
        return r;
    }
}<!-- 方式三必须开启 AspectJ 自动代理 -->
<aop:aspectj-autoproxy/>
execution表达式速记:execution(修饰符? 返回值 包名.类名?方法名(参数) 异常?),常用execution(* com.x.service.*.*(..))匹配该包下所有类的所有方法(任意参数)。
12.整合Mybatis
官方文档:mybatis-spring
整合步骤:① 写实体类与 Mapper 接口 → ② 配置数据源 DataSource → ③ 配置 SqlSessionFactoryBean → ④ 获取 SqlSessionTemplate(或继承 SqlSessionDaoSupport)→ ⑤ 注册 Mapper 实现类 → ⑥ 测试。
1.基础配置
<!-- 1.数据源(这里用 Spring 自带 DriverManagerDataSource 做示例) -->
<bean id="dataSource" class="org.springframework.jdbc.datasource.DriverManagerDataSource">
<property name="driverClassName" value="com.mysql.jdbc.Driver"/>
<property name="url"
value="jdbc:mysql://localhost:3306/mybatis?useSSL=true&useUnicode=true&characterEncoding=utf8"/>
<property name="username" value="root"/>
<property name="password" value="123456"/>
</bean>
<!-- 2.SqlSessionFactory:绑定 MyBatis 配置 & 数据源 -->
<bean id="sqlSessionFactory" class="org.mybatis.spring.SqlSessionFactoryBean">
<property name="dataSource" ref="dataSource"/>
<property name="configLocation" value="classpath:mybatis-config.xml"/>
<property name="mapperLocations" value="classpath:com/kuang/mapper/*.xml"/>
</bean>2.方式一:SqlSessionTemplate(推荐)
public class UserMapperImpl implements UserMapper {
    // 注入 SqlSessionTemplate(线程安全,可共享)
    private SqlSessionTemplate sqlSession;
    public void setSqlSession(SqlSessionTemplate sqlSession) {
        this.sqlSession = sqlSession;
    }
    public List<User> selectUser() {
        UserMapper mapper = sqlSession.getMapper(UserMapper.class);
        return mapper.selectUser();
    }
}<bean id="sqlSession" class="org.mybatis.spring.SqlSessionTemplate">
<!-- 只能使用构造器注入,没有 setter -->
<constructor-arg index="0" ref="sqlSessionFactory"/>
</bean>
<bean id="userMapper" class="com.kuang.mapper.UserMapperImpl">
<property name="sqlSession" ref="sqlSession"/>
</bean>3.方式二:SqlSessionDaoSupport
public class UserMapperImpl2 extends SqlSessionDaoSupport implements UserMapper {
    public List<User> selectUser() {
        // 直接通过 getSqlSession() 获取,无需自己注入 Template
        return getSqlSession().getMapper(UserMapper.class).selectUser();
    }
}<bean id="userMapper2" class="com.kuang.mapper.UserMapperImpl2">
<property name="sqlSessionFactory" ref="sqlSessionFactory"/>
</bean>事务注意:整合完成后,还需在 Service 层配置声明式事务(见下一节),否则多步数据库操作无法保证一致性。
13.声明式事务
1.回顾事务
- 把一组业务当成一个业务来做:要么都成功,要么都失败
- 事务在项目的开发中,十分重要,涉及到数据一致性问题,不能马虎!
- 确保完整性和一致性:
事务的ACID原则:atomicity,consistency,isolation,durability
- 原子性 要么都成功要么都失败
- 一致性 要么都提交 要么都失败 资源和状态保持一致
- 隔离性
- 多个业务可能操作同一个资源,防止数据损坏
- 持久性
- 事务一旦提交,无论系统发生什么问题,结果都不会再被影响,被持久化写到存储器中。
2.spring中的事务管理
- 声明式事务: AOP
- 编程式事务: 需要在代码中进行事务的管理
思考:
为什么需要事务?
- 如果不配置事务,可能存在数据提交不一致情况下;
- 如果不在spring中配置声明式事务,我们就需要在代码中手动配置事务
- 事务在项目开发中十分重要,涉及到数据的一致性和完整性,不容马虎!